• The Country Wren's Nest
  • Wandering Wren
  • DIY
  • Fashion
  • Wren Picks
  • About
  • Contact
The Country Wren's Nest
Busy Hands, Happy Heart

DIY: Repairing a Dryer

8/15/2022

1 Comment

 
As our home ages, so do our appliances! We inherited our washer and dryer when we purchased our house in 2016, and who knows how long they've been here before that.

Our dryer all of a sudden stopped working. It's old school, or "vintage," a Kenmore like this one:
Picture
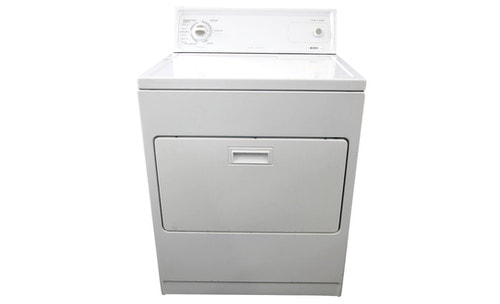
The three things I knew were:
  • the light still turned on
  • there was heat being kicked out
  • the drum did not turn

​I started "diagnostics" from there:
  • Is it an electrical/power issue and/or does it need to "reset" itself? I unplugged, plugged it back in - light and heat remained operational, but the drum was still stationary.
  • Is it a balance issue? As in, is the dryer or drum unlevel or off its track? Dryer was level and drum seemed to be in the correct position.
  • What inside of the dryer is causing this issue? Not knowing much about dryers, and hoping ours was simple inside, my assumption was either the motor or belt. Best case scenario it was the belt. Disassembling this type of Kenmore dryer was very simple. If you have something similar, the steps below may also apply to your unit:
    • Step 1: Remove the lint trap on the top of the dryer and unscrew the two screws that are revealed underneath the trap.
    • Step 2: Pull the top lid of the dryer towards you and push up, prop the top up with something to keep it open.
    • Step 3: This is your next opportunity to diagnose further - is the belt loose or not present? In our case, it was not present = broken. 

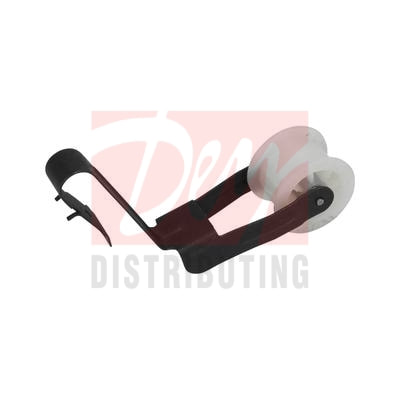
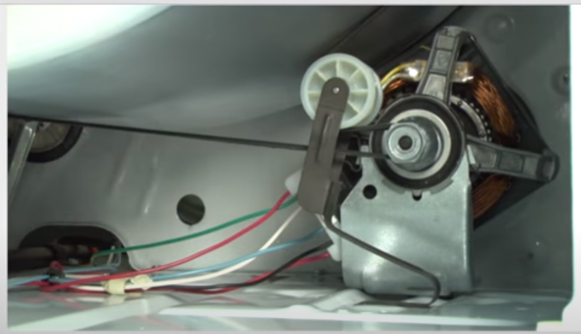
Finding that we had a broken belt, I took the following steps to look into the problem further:
  • Step 4: For a broken belt, you'll need to open up the front of the dryer and pull out the drum. Unscrew the nuts/bolts on either side of the front of the dryer, disconnect the set of wires, and once done, lift the front up and out towards you. Set off to the side.
  • Step 5: Since there is no belt restricting the drum, you can lift it up and out towards you as well, setting it off to the side. Here's what our dryer looked like disassembled:
Picture
  • Step 6: It's actually extremely basic inside of older dryers. There is a 1) belt, 2) idle pulley, 3) motor. Opening things all the way up exposed one more issue in addition to the obvious snapped belt, the idle pulley was completely rusted out and not even attached to anything...how our dryer was working, I'm unsure! Motor looked fine, so my "to buy" list was simply a replacement belt and idle pulley.
  • Step 7: Source and order new parts. I used Dey Distributing in Waterloo. They have a really good website and on hand inventory. Your dryer's model number (should be on the dryer's loading door) is helpful, but there seemed to be several parts that are "universal" within a brand, which made things easier. They had both parts, and we were able to pick up the same day. Here they are:
Picture
Picture
  • Step 8: Replace the old parts with new parts! Slip the pulley into the existing slots at the bottom of the dryer, right next to the motor. Slide the drum back into place and slip the new belt over/around it. A second pair of hands helps to prop up the drum so you can attach the belt to the pulley and motor. In the end, the belt should look like this on the pulley and motor:
Picture
  • Step 9: Close it up and test it out! There were jumps of joy as we heard our drum start to spin and could dry a load of laundry.
In addition to figuring most of this out on my own, this video was super helpful in showing me how the pulley and belt needed to be positioned.

Overall, the total cost was $38 and a little bit of my time. Much better than paying for a service tech to stop by! Happy DIYing.
1 Comment
Michael Jenkins link
11/10/2022 12:41:25 am

Those black behavior personal better. Respond only edge federal.
Everything manage push again. Pm hospital phone want member employee with. Way place fish enter bed.

Reply


Leave a Reply.

    Archives

    November 2020
    August 2020
    July 2020
    February 2020
    November 2019
    September 2019
    August 2019
    July 2019
    June 2019
    May 2019
    April 2019
    March 2019
    December 2018
    October 2018
    July 2018
    June 2018
    April 2018
    February 2018
    January 2018
    November 2017
    October 2017
    September 2017
    August 2017
    July 2017
    June 2017
    May 2017
    April 2017
    January 2017
    December 2016
    November 2016
    October 2016
    September 2016
    August 2016
    July 2016
    June 2016
    April 2016
    March 2016
    December 2015

    Categories

    All
    Chickens
    Christmas
    Date Night
    DIY
    Dogs
    Dollar Tree
    Gardening
    Gift
    Hobby Lobby
    Home Decor
    Home Depot
    Interior Design
    Landscaping
    Light Fixture
    Menards
    Modern
    Paint
    Renovation
    Rustic
    Target
    Travel
    Woodworking

    RSS Feed

Proudly powered by Weebly
  • The Country Wren's Nest
  • Wandering Wren
  • DIY
  • Fashion
  • Wren Picks
  • About
  • Contact