Busy Hands, Happy Heart
|
I have been seeing cute little pumpkins made from cloth everywhere this season. I decided not to purchase any because I knew there had to be a DIY option. After some planning on my own and Pinterest searching, I compiled my ideas and created my own version of a no sew cloth pumpkin! What you'll need:
Start by cutting the sleeve off your chosen sweater or t-shirt. 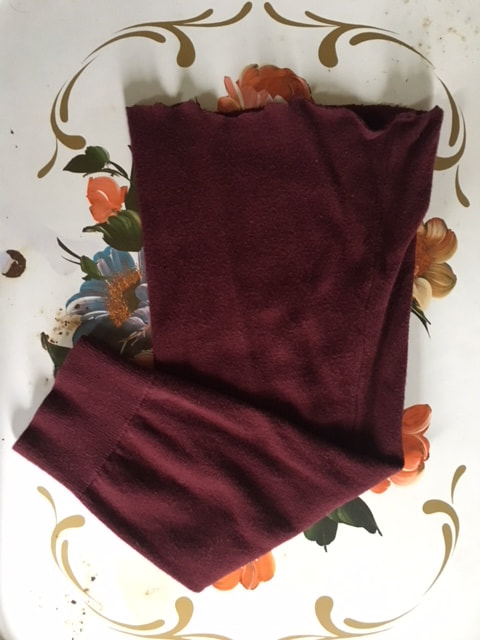 Flip the sleeve inside out and secure a rubber band at one end. 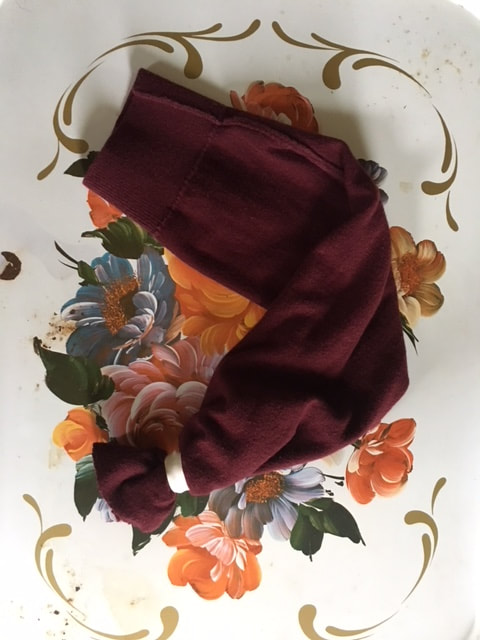 Flip the sleeve right side out and pour rice into the open end of the sleeve. Keep adding rice until you reach the desired shape of your pumpkin. (Good luck not spilling!) 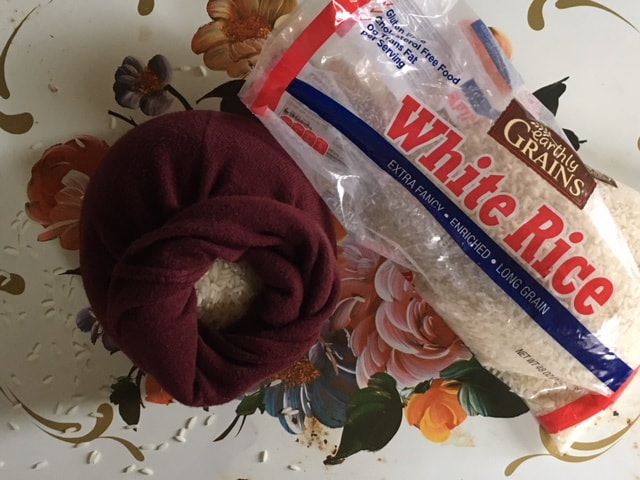 Once you're pleased with how your pumpkin is shaping up, twist the cloth at the top of the pumpkin and secure with another rubber band. 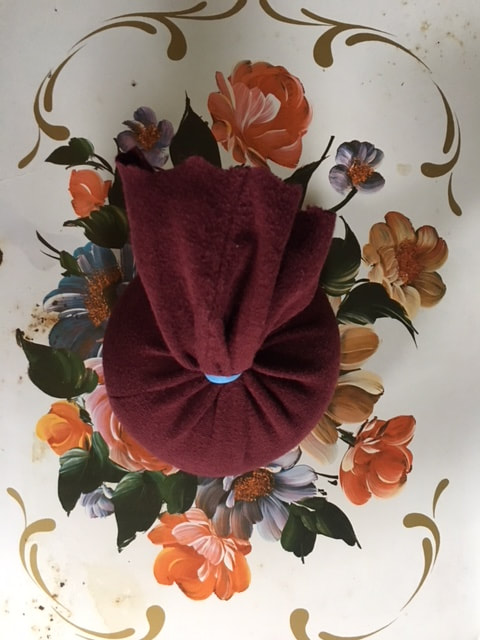 Next, you'll start creating the stem. Starting at the bottom of the rubber band you just put on, start winding twine around the rubber band and fabric, twisting the cloth as you wrap the twine tightly around it.  Once you get to the top of the stem, wind the twine back down to the bottom and secure the end with all purpose glue. 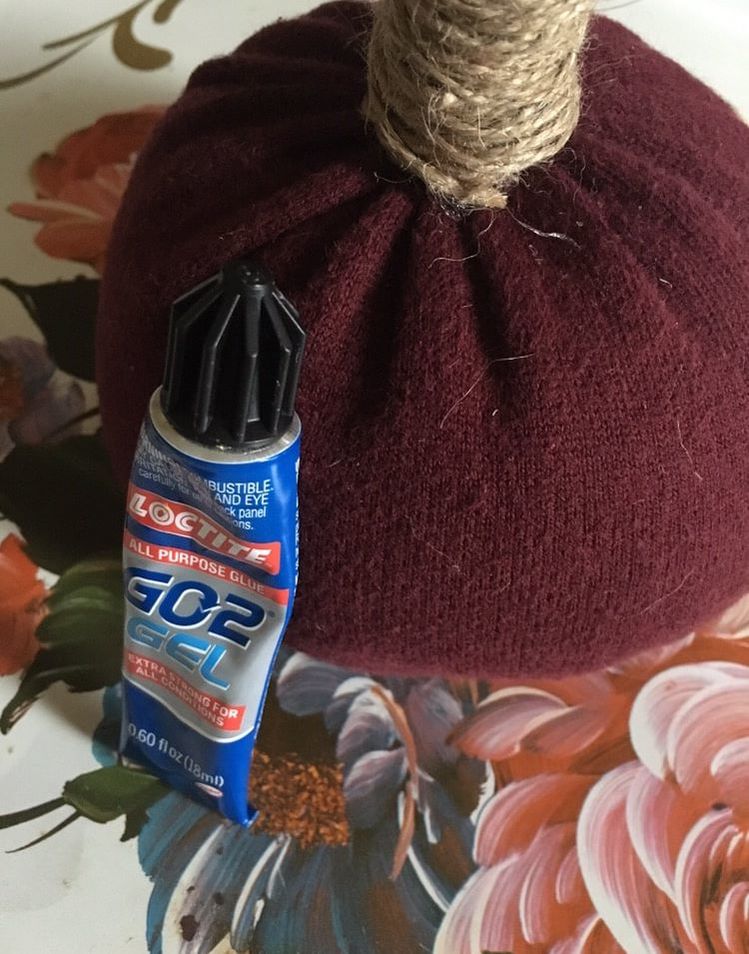 The last thing you'll do is trim the extra fabric from the top of the stem.  I used a men's sweater, a women's sweater and a men's t-shirt (all pulled from our closets) for my pumpkins. The different sizes and fabrics of the clothing pieces created three unique shapes that I liked equally! 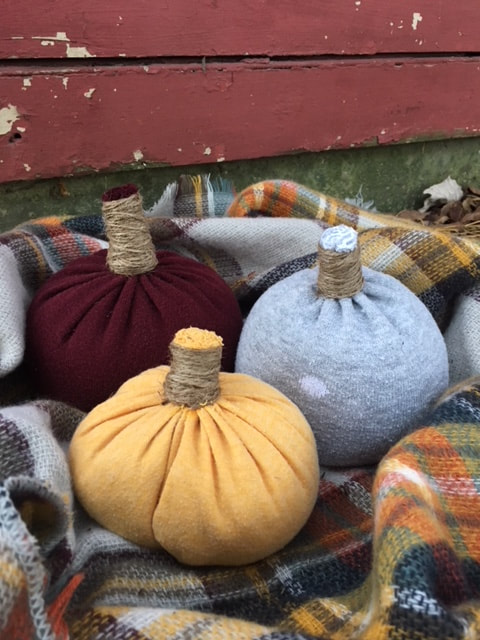 The rice gives these pumpkins nice weight and allows you to shift their shapes so you can style these a little easier than if you were to use Fiberfill for stuffing (which is a technique I ran across a lot for these). It literally took me minutes to pull these together and I loved that this project allowed me to repurpose a few pieces of old clothing! 
0 Comments
I'm preparing myself for the day frost kills off my flowers and garden, which will be sooner than I think, and a sad day...So to fill the space my outdoor plants took up in my heart this year, I'm attempting to hoard a few house plants to hold me over until next Spring. I've always wanted to start a terrarium, so gave it a shot. It was super simple and turned out so pretty. I now understand why they're such a popular way to grow and display plants. Here's what you'll need:
Start by cleaning the inside of your terrarium. 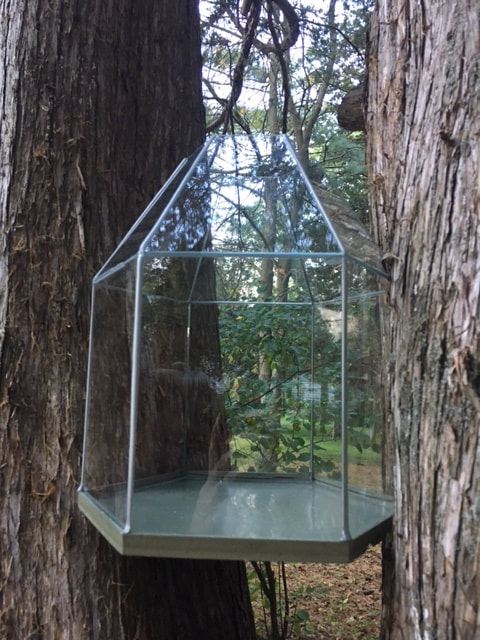 Next you need to establish your drainage layer, filling the bottom with small rocks. I laid down a little over an inch of rock.  I then put in a thin layer of activated charcoal. This helps ensure excess water doesn't stay in the soil and cause root rot. 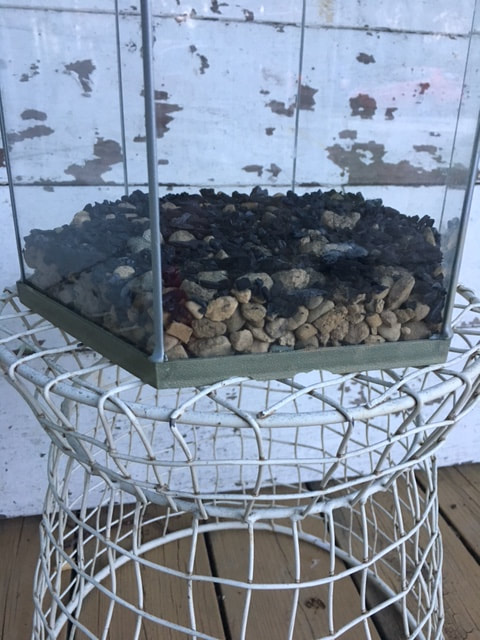 Once I had the drainage layer in place, I started adding potting soil. I put a think layer in, a little over 3 inches, expecting it to settle as I began to water the plants. I also wanted enough dirt to place the plants into! 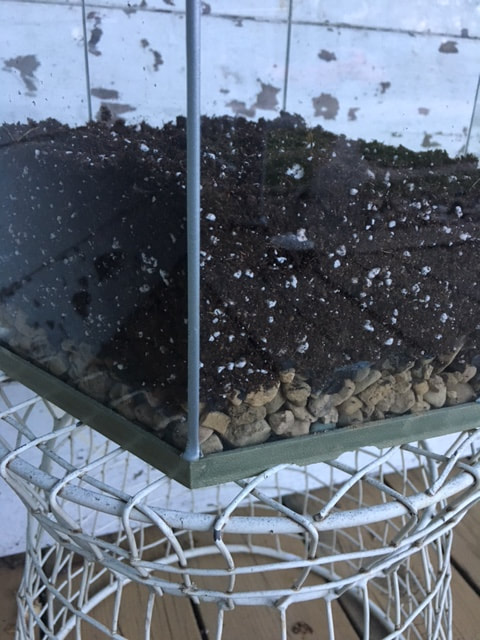 The final step was adding the plants! I selected four small plants of different varieties from Treasures on Main in Westby, Wisconsin. Three will be a little taller, one is more of a ground cover. 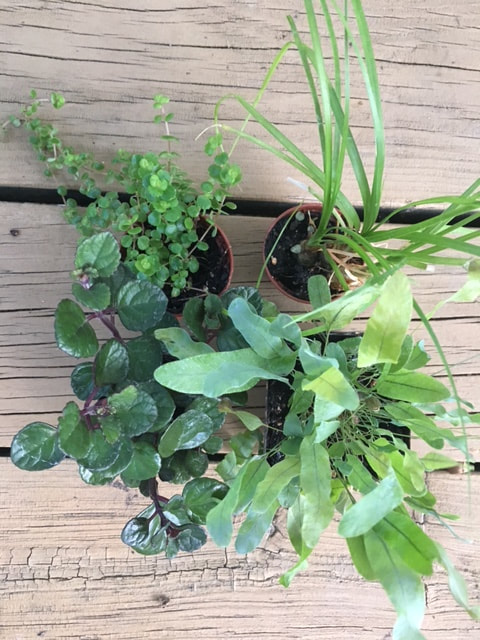 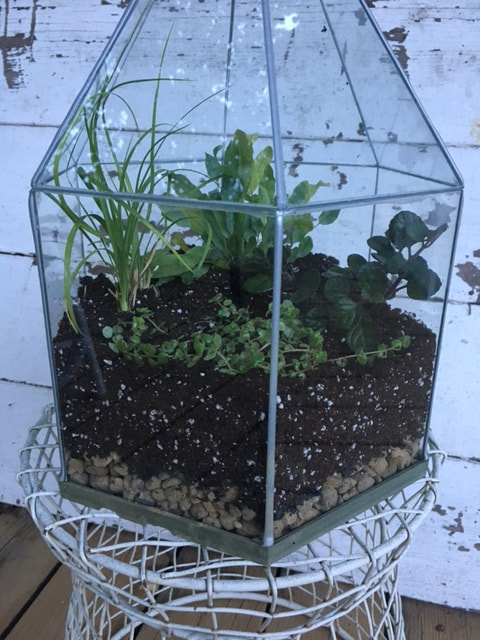 There are so many things you can do with terrariums. A quick search on Pinterest will reveal image after image of cool ideas! Get creative! I plan to add some colored rocks and small figurines to mine once I see how the plants grow in.
Over the summer months we completed a really fun project at our family cabin - a fishing pole photo display showcasing the Miller side (my mom's side) of our family.  Here's what you'll need:
We started by marking out where we wanted to secure the pole on the wall. We used one screw between the handle and reel, and one screw at the tip of the pole after determining how far we wanted the pole to bend above the doorway. From there, we added fishing line by tying it to the loops located on the pole itself. We cut the lines to various lengths depending on where we wanted the fishing lures and photo frames to fall. Once the line was in place, we started attaching the fishing lures and photo frames. The fishing lures have small hooks that pop out of the top, so we were able to easily secure them to the lines. To make sure the photo frames stayed on the line, we placed one thin poster mounting square on the back of each photo - pinching the fishing line between the mounting square and the back of the frame - so they dangle freely vs. being stuck to the wall. Here are some close ups of this project:   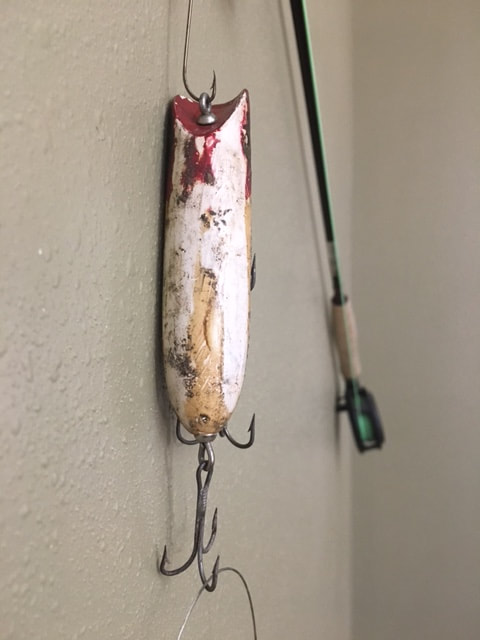 And here's my cute grandma with the finished project. We have her to thank for so many good memories at the cabin! 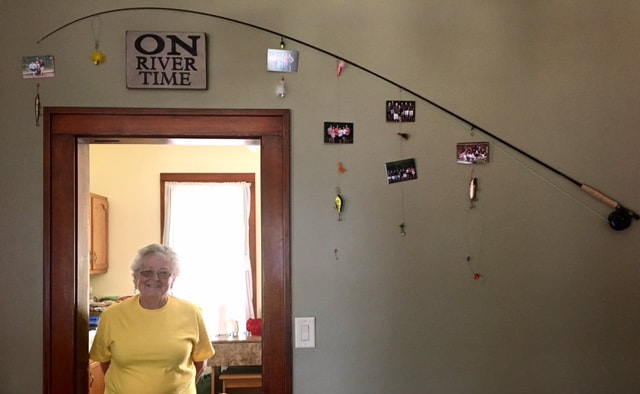 I'm sharing this here because it's something I didn't know about and I think it might be helpful for someone with a small pet needing fixed! We recently got a new puppy, Homer. He is a year old, but was not fixed when we adopted him from the Cedar Bend Humane Society. Part of the deal before he "officially" became ours is that he needed to be neutered. We took him in just a few days ago, and let me tell you, it was an emotional day for me. I have a tendency to jump to the worst conclusion and was so afraid something bad might happen to him during surgery. I've become quite attached to Homer in a short time and just couldn't imaging our life without him if something happened. Good news though...he lived! No issues, went perfectly fine (as I should have known it would). The humane society didn't have a cone for us to use, so we had to pick something up from the pet store. We opted for the inflatable "doughnut" type contraption vs. the traditional cone. Long story short, it didn't work. Overnight, he found his way around the doughnut and was licking his incision site, which was a BIG problem. At 6 a.m., Joel and I were up brainstorming ideas about what to do since neither of us could stay home from work to monitor his activity. No pet stores opened before 9 a.m., so we had to get creative while very not awake. Eventually, we ended up deciding that a baby onesie and safety pins was the answer.  Joel made a quick run to WalMart (the only place open at the time) and purchased baby onsies, safety pins, and male puppy diapers.  We put a diaper on him first (since we were leaving him free, out of his crate for the first time, and didn't want him to potty in the onesie). Then the onesie, with the shoulders and bottom snaps secured with safety pins.  This method has worked GREAT. We put everything on him before work and bed, letting him run around "naked" when we're able to monitor him. It offers full protection and appears to be more comfortable for him than a cone.
I highly recommend this DIY method for small pets (cats and dogs) that have just been fixed over use of a "doughnut" or cone - both for the comfort of the pet and because the cuteness factor is off the charts! My Fall decorating routine is in full swing. Once September 1st hit and the temperatures started to dip, I was in the mood! When the mood struck, I also happened to be cleaning out our basement. It was great timing because I was able to "shop our house" for some décor pieces that I could use this Fall. I felt particularly inspired by these finds: 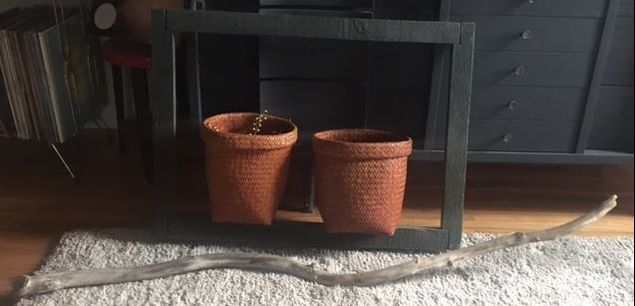 The frame and piece of driftwood were something I had hanging on the porch of our last house. The frame used to have a screen inside it, but it had come undone after being haphazardly shoved in the corner of the basement...which actually worked in my favor for this project. The baskets were finds I picked up at Gooselake Creations, but hadn't found the right spot for them yet. I played around with different ideas and really thought it would be neat to make a "3D" piece of art using the items mentioned above and some artificial flowers. Our dog, Homer, loved my vision and was interested in helping! 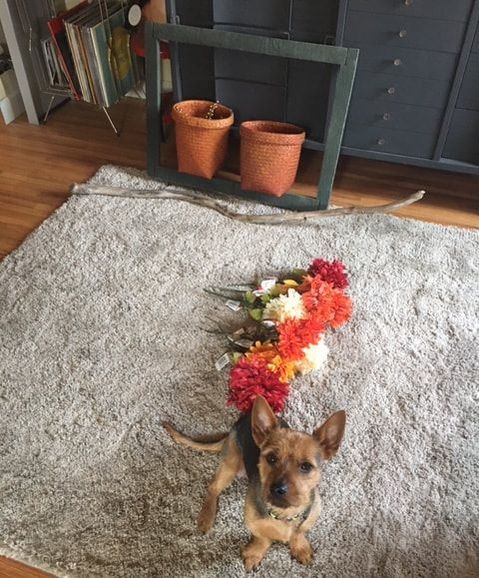 We had a large frame hanging in our entertainment center area already (see below), so I was able to utilize the existing nails for the frame. Because the baskets had some weight to them, I chose to nail them into the wall. A surprise I wasn't expecting was the outlet we added during our renovation in case we ever mount a TV to the wall. With the open frame, the outlet was not aesthetically pleasing! I chose to cover that with a piece of burlap. The burlap is optional if you do this project, it was a necessity for me! Once I had everything in place, I started arranging the flowers I purchased inside the baskets. I found some beautiful mums in cream, burgundy, orange, and yellow at Dollar Tree (one of my favorite places for artificial flowers). This project was as simple as that! See below for the finished product: 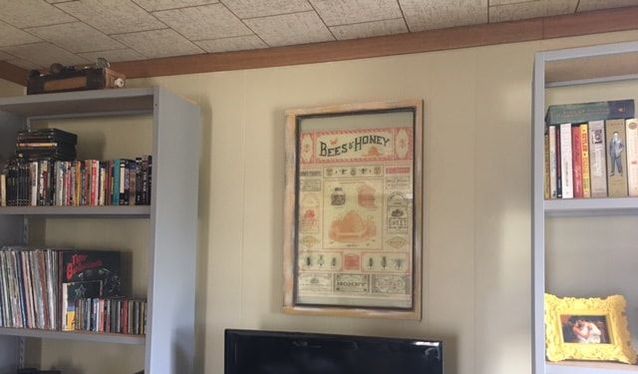 Area Before 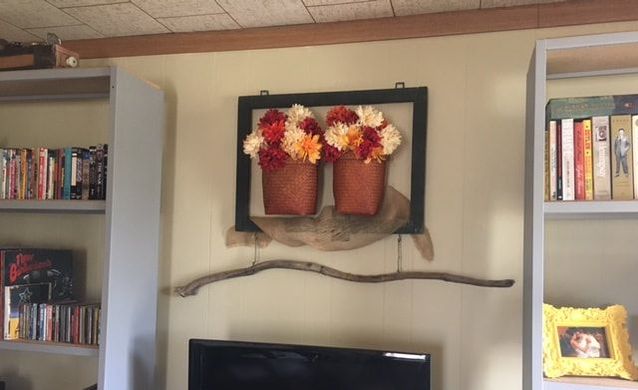 Area After 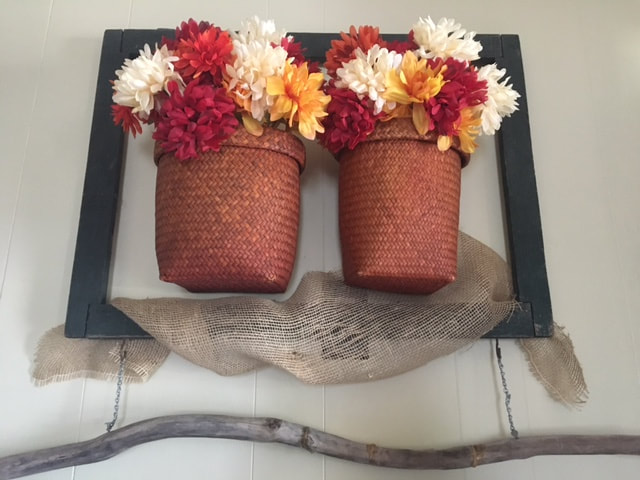 I really enjoy looking at homes when I'm driving to wherever I'm going. I like to look at the exterior styles, love when I can catch a glimpse of the inside (not in a creepy way, I promise), and am always looking at outdoor decor. There are just so many ideas out there to draw inspiration from! I'm a big fan of porches. I recently drove by a home that had colorful pennant banners hanging from the ceiling of their large, wraparound porch. It looked so adorable, I couldn't get it out of my head... We're tight with our budget right now, so I wanted to find a cheap option to execute this idea ASAP. Without any luck finding pre-made banners at discount stores, I decided to make my own with two items I already had at home: twine and burlap. Here are all the supplies you'll need:
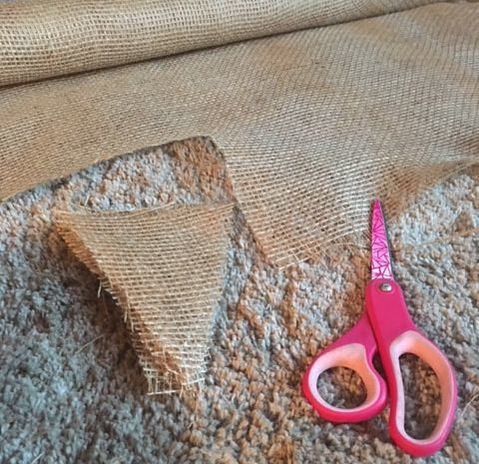 I knew I had two, eight foot strands of twine to fill with pennants, so I cut quite a few to start and then started laying them out along the twine I had measured out. Once I had all of the pennants cut, I started weaving the twine through the top of the pennants: 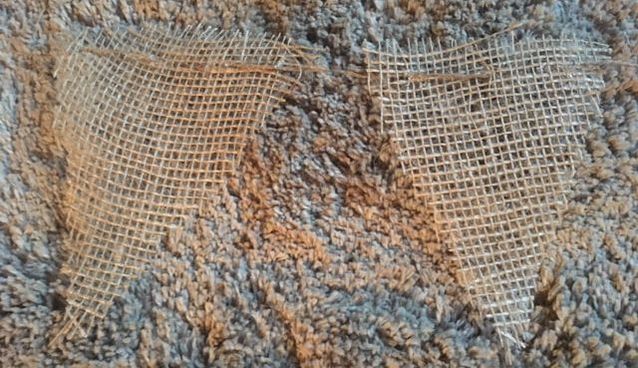 After I had all of the pennants on the twine, I put a dot of all-purpose glue where the twine and burlap intersected. 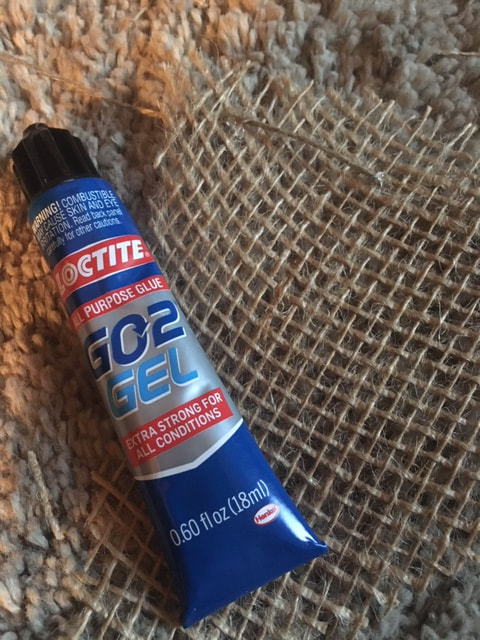 When the glue was applied to every pennant, I hung the banners up to dry:  And here's the final product on our front porch: 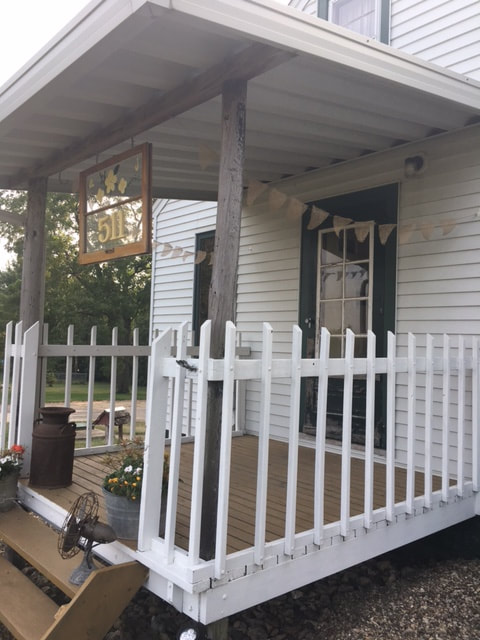  I think these turned out so cute and because they are plain burlap, they will definitely look good with my Fall decor, but will also look good during other seasons throughout the year! They would also work well indoors.
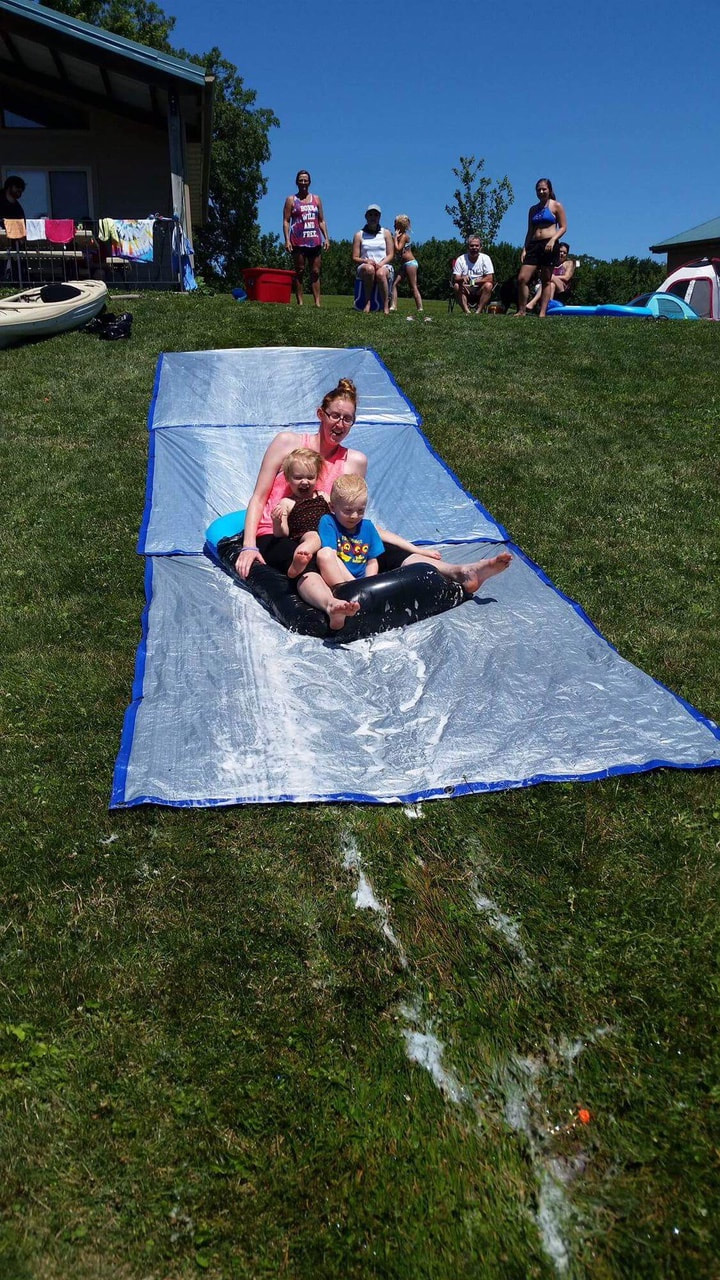
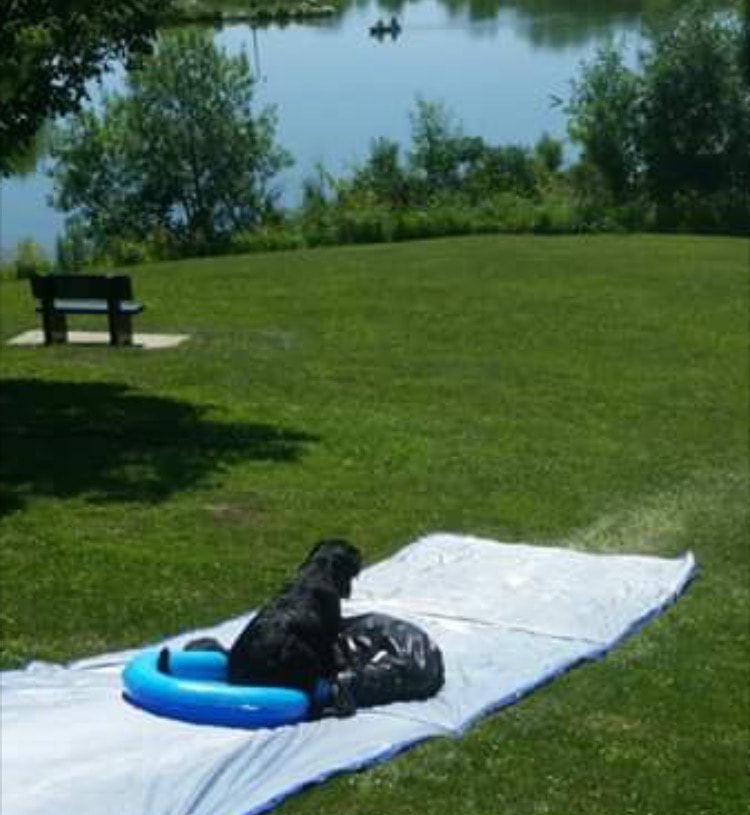
Here's something I never thought I'd write a DIY post about: creating your own slip & slide! But you know what, I'm so glad I am because it was a really fun idea to try. To create your own slip & slide that is adult, child and dog friendly, you need the following supplies:
Step 1 Position your tarps on a hill. Pour water down the tarps to test how it flows. Re-position the tarps as needed because it is very likely that wherever the water flows, the rider will flow. Make sure your tarps overlap slightly. You want the bottom part of your first tarp to slightly overlap the top part of your next tarp. This way the water and riders flow smoothly down the slide. Step 2 Secure the tarps with small tent stakes. Be mindful of how they are positioned so they do not scrape the slip & sliders! We learned that the hard way...Place the stakes in the top two, outside grommets of each tarp, we did not stake the bottom grommets, which allowed for some movement as people were going down. 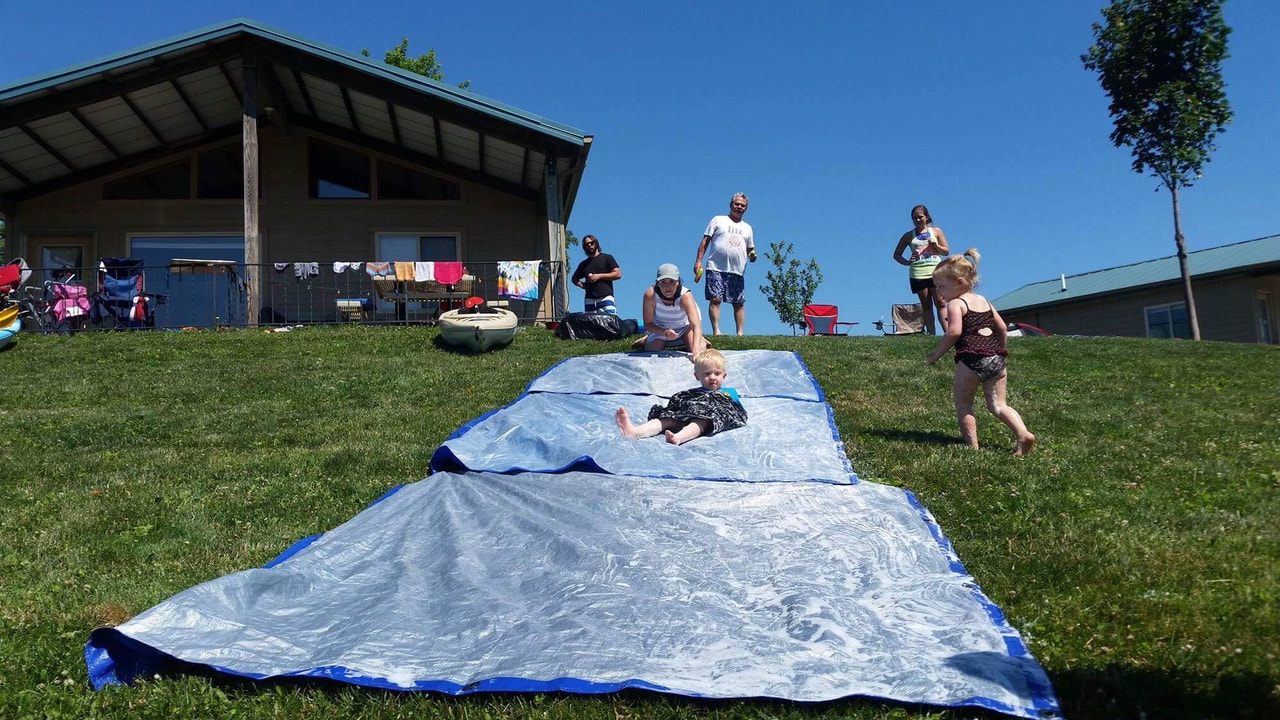 Step 3 Cover your tarps with dish soap. You'll need to reapply the dish soap when it appears riders start to slow down. The soap will start creating a nice foam as riders continue to go down. Step 4 Let the water flow. If you have a hose, fantastic. Let it trickled down the slide during use. If you need to use tubs/buckets like we did, have back-up tubs filled up with water and use a bucket to throw water down the slide periodically, especially just after you apply the dish soap. Step 5 Get ready to slide! Going down sitting on a garbage sack worked really well if that's all you have. The next best option was a roll up snow sled. We squirted dish soap on the bottom of the sled and could fit up to four little ones or two adults on the sled each time. It flew down into the grass every time! The other item we used was an inflatable lounger wrapped in a garbage sack. This option also allowed for more than one person to go down at a time. 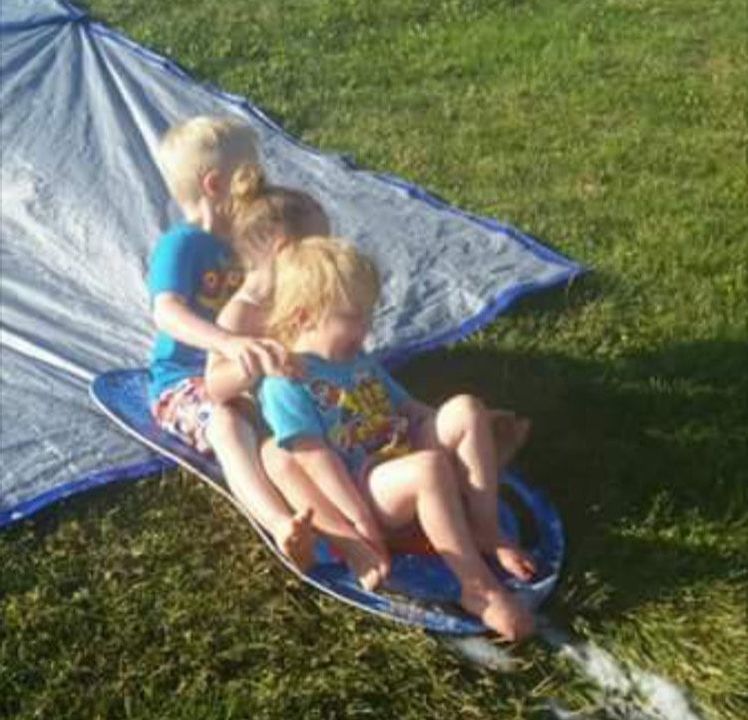 My husband called this invention "Aunt Augusta's Hillbilly Slip n' Slide," but you can call it whatever you'd like! It's definitely a cheap, easy way to have some fun in hot temperatures, and like I said before, is fun for all ages - human or dog! Although growing a fruit and vegetable garden has been extremely enjoyable and rewarding, one downside where we live are the critters. We have cats, birds, mice, wild turkeys, bunnies, woodchucks, bugs and deer - that I know of. They have been quite kind in leaving my plants alone for the most part, but I have had to put some measures in place to keep them away. 1. Cayenne Pepper Cayenne pepper is especially good to keep away rabbits. They can't take the heat! I sprinkle cayenne pepper on the leaves and around the base of each plant. I've been doing this for years, even when we lived in town, and it works every single time. 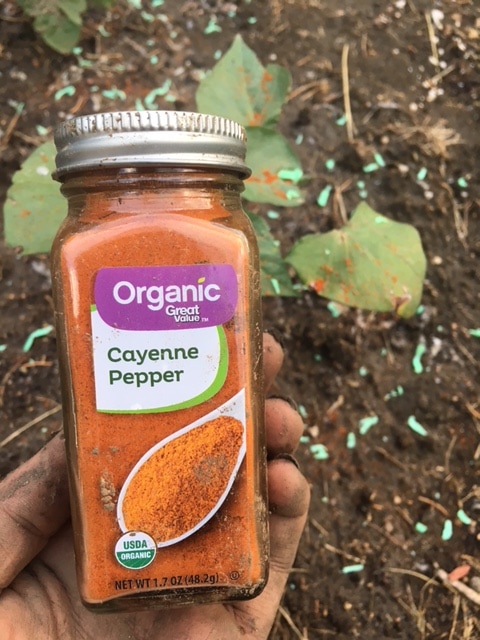 2. Irish Spring Soap This type of soap is good for keeping deer away. Deer HATE the smell of Irish Spring. We have one doe that lurks around in our garden area and it seems like this is effective in keeping her away. I use about one full bar each time I reapply in my garden, which is normally every 2-3 days or after it rains. An old cheese grater that I found in my attic has worked perfectly for grating the soap around each plant. 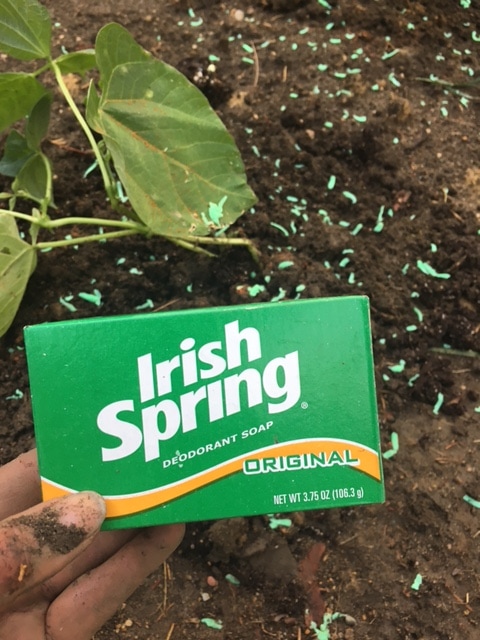 3. Pinwheels I read that having some type of "movement" in your garden deters animals from approaching. We placed pinwheels around the perimeter of the garden. They catch the slightest breeze and are rarely still. I found the ones we are using at Dollar Tree for $1 each and they've held up very nicely through some very strong storms. 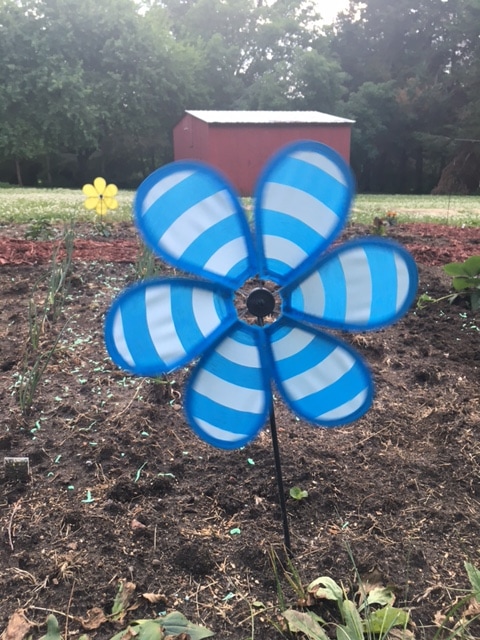 4. Wind Chimes I love the sound of wind chimes, so there is no shortage of them at our house! We placed small wind chimes around both my fruit/vegetable garden and wildflower plot. Animals are supposed to be frightened by the sound of the chimes and birds do not like items that are reflective. I was able to find both the wind chimes and stands for the chimes from Dollar Tree, again, for $1 a piece. 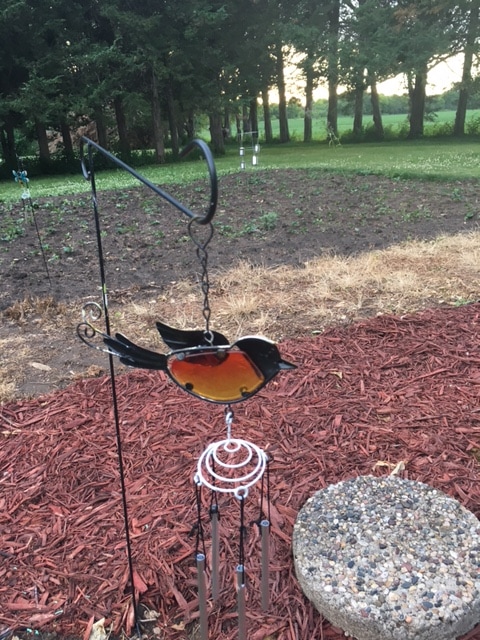 5. Marigolds Planting marigolds is a traditional gardening tip. Marigolds supposedly mask the sent of vegetables, confusing garden pests. We planted them around the entire fruit/vegetable garden. They must also be delicious, because the deer started nibbling on a couple. I fixed that by utilizing tip number two and sprinkled some Irish Spring around them, which did the trick! 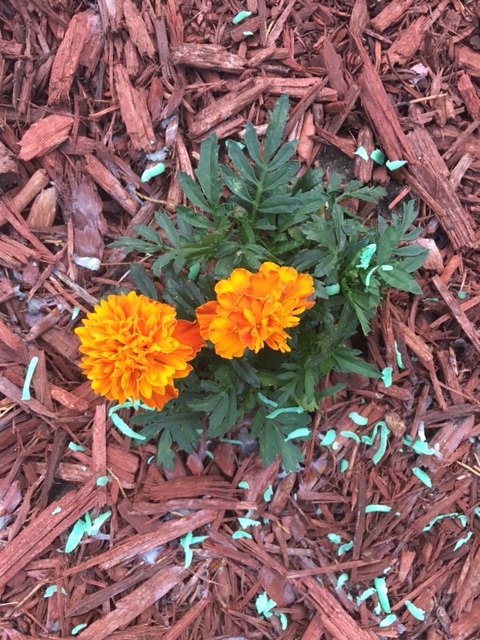 6. Tomato Cages + Tin Cans I planted two established perennials in my wildflower plot that will be good for attracting butterflies. What I didn't know is that they were also good for attracting deer! My solution was to place tomato cages around the plants, hanging tin cans from twine around the outside. I wanted the cage to block its head from the plant and for the cans to make sound to scare it away. I'm happy to report that this has worked and both plants are coming back! 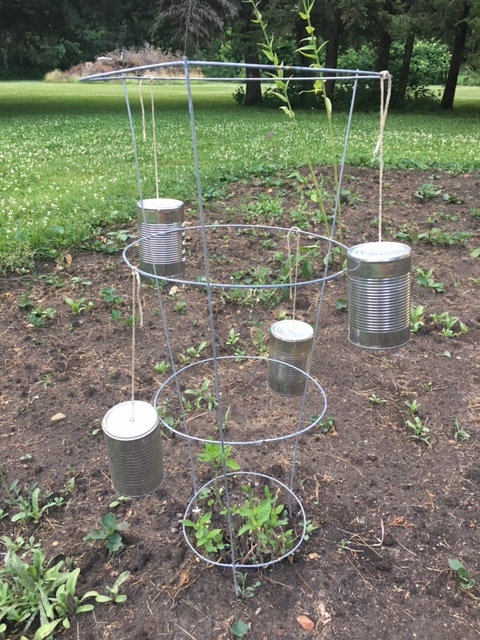 I hope these tricks help you keep critters out of your garden as much as possible! If you have any good tips for keeping wildlife from eating flowers and or fruits/vegetables from your garden(s), I'd love for you to share them in the comments below! I'm sure every gardener will agree, every "battle" with the wildlife has been worth it. Because this is what you get in the end: 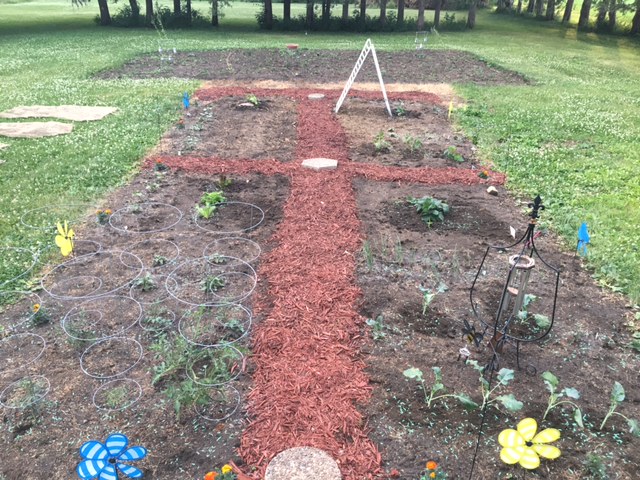 And this is how big your smile gets to be:  I've turned into the woman standing at the edge of her garden willing her plants to grow. We've had quite the dry spell, and our hose is not hooked up yet, so Joel and I have been toting buckets of water out every other day or so. I'm a gardening beginner. I don't know a whole lot about growing vegetables, but I'm giving it a try! In doing some online research, I found that having a trellis for your cucumbers is important because it keeps them fresh, clean and disease free. Along with my research, I looked for trellis options I could buy and trellis options I could make. I opted to make my own by repurposing an object commonly found at yard sales and auctions. What do you see when you look at this picture? 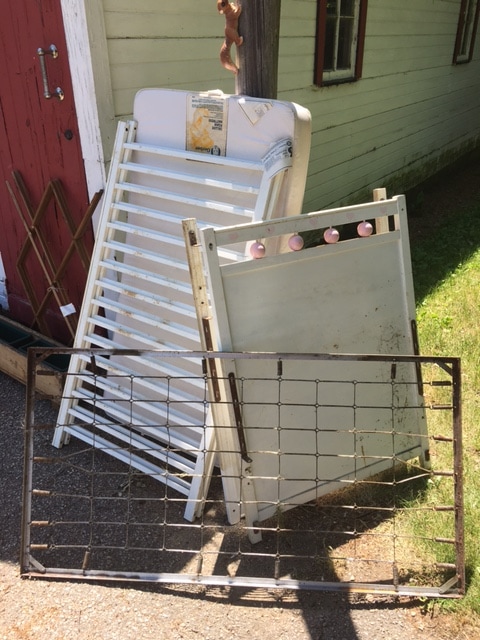 I bet you said an old baby crib, right? Yep, you got it. But I saw much more than that! I saw: a trellis (2 barred sides of crib), two signs (2 solid sides of crib) and a light fixture (mattress spring). I was SO thrilled with this find at a local yard sale for just $10! And the best part, minimal assembly was required to create my cucumber trellis out of the barred sides of the crib. After finding my material and gathering the supplies I needed, I accomplished this project in two easy steps! What You'll Need:
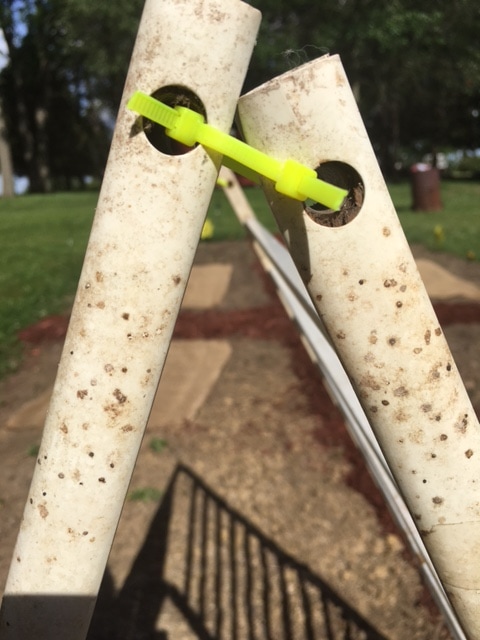 Step 2: If your sides are wooden, I'd recommend wrapping a piece of garbage bag around the bottom to help prevent rot. Once that's done, figure out how wide you want your trellis to stand, dig into the dirt a few inches and bury the garbage bag wrapped bottom of the sides for stability. 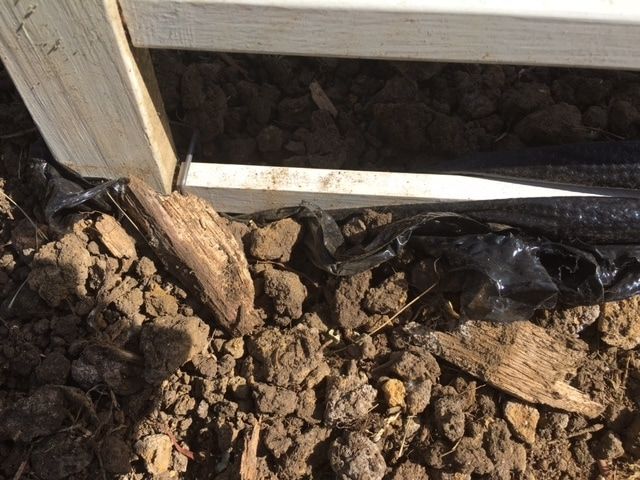 That's it! You now have a cucumber trellis, or flower trellis, or whatever kind of trellis you want it to be. Here's what it looked like in our garden at the beginning of the season in May: 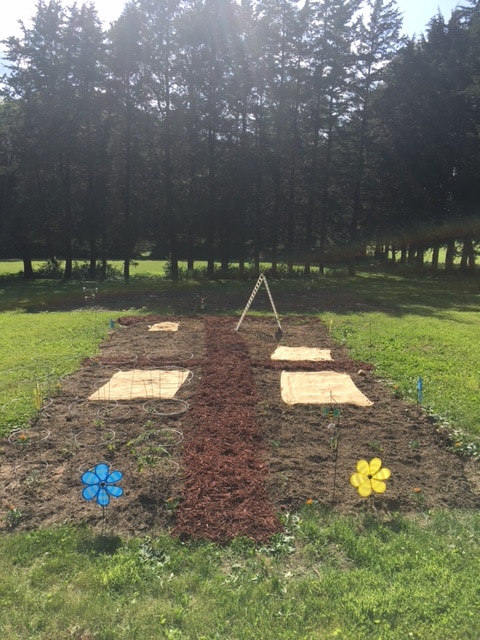 Here's what it looked like in July, just after the cucumbers really started to take off: 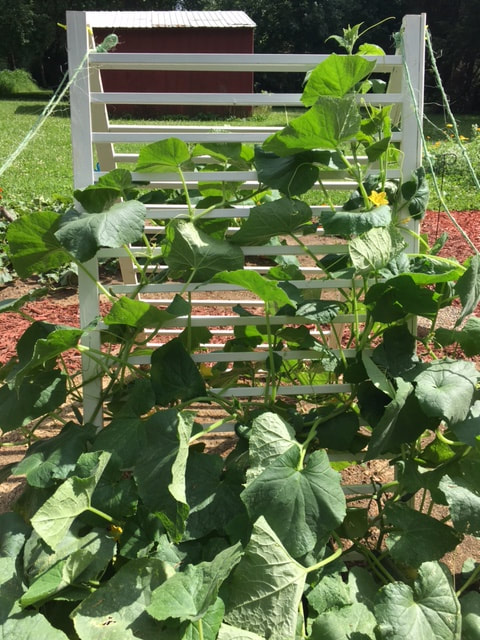 Playing with electricity, especially in an old house, can be a little nerve wracking. But that didn't stop us from swapping out the light fixture in our kitchen! Expert details on how to install a light fixture can be found here. Who better than Bob Vila to walk you through this? We're definitely not experts, but I'll show you some visuals and a life hack we learned from our installation below. The first and most important step is SHUTTING OFF THE BREAKER TO THE AREA YOU'LL BE WORKING ON! Next, start to carefully remove the existing light fixture.  We chose to take out the plate that extended across the electrical box and utilize the new one. We did recycle the old screws because the depth of the electrical box was more than the length of the screws that came with the new fixture.  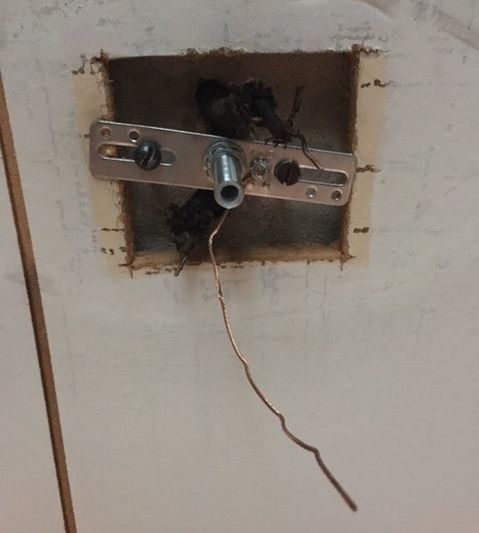 Before we began to install the fixture, we needed to trim and strip the wires at the top of the fixture where it would hang. We did not have wire strippers, so here's a life hack: You can use scissors (as long as you use them gently). I applied light and consistent pressure with the scissors on the casing of the wires until I was able to slide it off. The goal is to remove the casing without severing any of the wire. 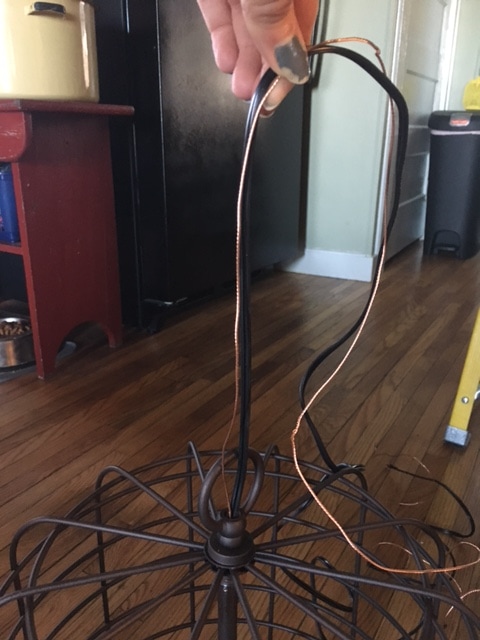 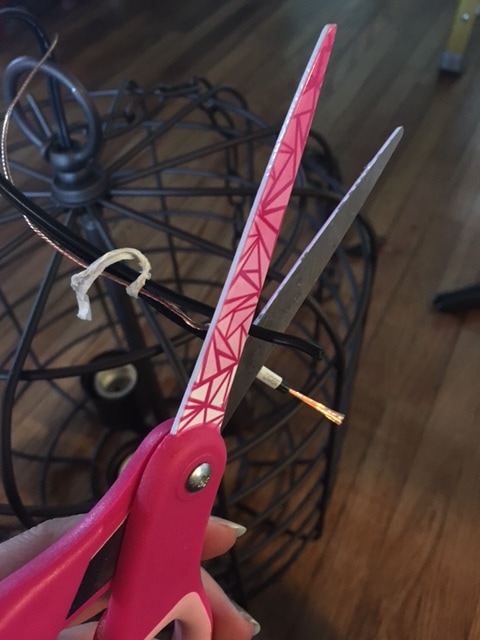 Once that was complete, we cut the chain to the desired length and wove the wire through it. 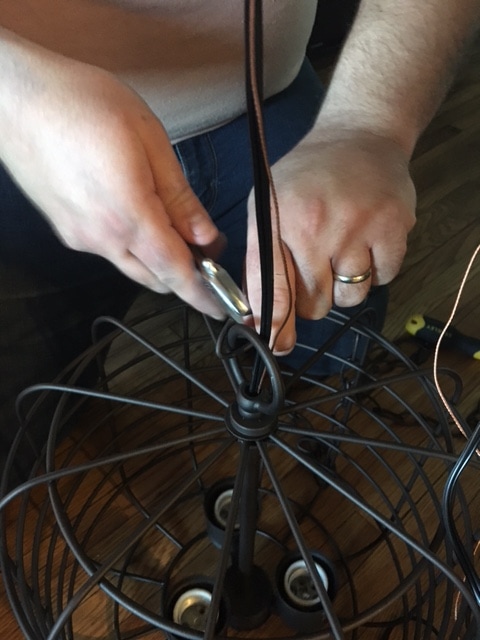 Following the instructions in the box, we connected the electrical box and fixture wires accordingly, securing them with wire nuts. The final step included fitting the fixture's base over the electrical box and securing it. 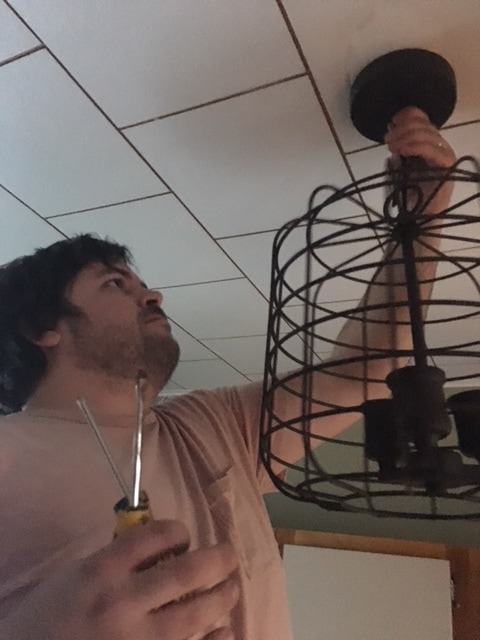 We love the warm glow of this fixture's Edison bulbs and its farmhouse style. We got this one from Menards if you're interested! 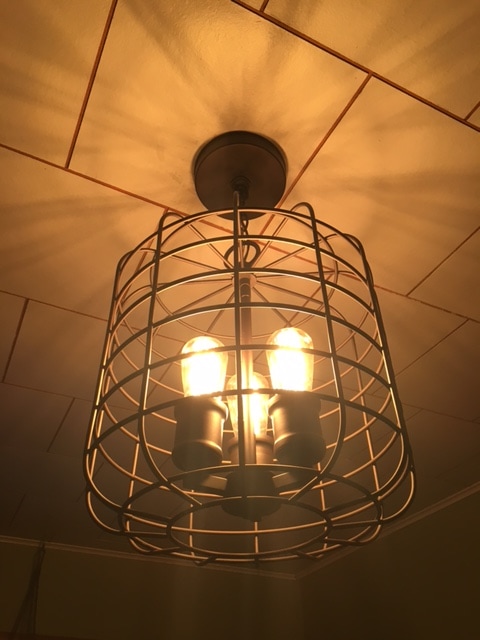 |
Archives
August 2022
Categories
All
|
 RSS Feed